

To replace an AC compressor without vacuuming, remove the refrigerant, and then swap the compressor. Ensure system is properly sealed and recharged after installation.
Replacing an air conditioning (AC) compressor without a vacuum pump is not the standard method and generally not recommended as it can lead to potential issues with your AC system. However, if you find yourself in a situation where you must proceed without vacuuming, the process involves several critical steps.
You’ll be removing the existing refrigerant safely, disconnecting electrical connectors and refrigerant lines, removing the old compressor, and installing the new one. It is crucial to ensure that your AC system is perfectly sealed after fitting the new compressor to prevent any contaminants from entering. Afterwards, recharging the system with refrigerant is necessary for optimal operation. Keep in mind that without vacuuming, you risk leaving moisture and air in the system, which can impair its efficiency and lifespan.
Introduction To Ac Compressor Replacement
Replacing your car’s AC compressor can seem daunting. Yet it’s a crucial task. A functional compressor is key to a cool and comfortable drive. This guide sheds light on the process and offers key safety tips. Let’s dive into the first steps for a successful swap-out.
Understanding The Role Of The Ac Compressor
The AC compressor is the heart of your vehicle’s air conditioning system. It circulates refrigerant and cools your car. When it fails, the entire system comes to a halt. Know its role before tackling the replacement process.
The Importance Of Proper Installation
A precise install ensures system efficiency and longevity. Skipping steps like a system vacuum can lead to issues. Understand the importance of careful installation to avoid future headaches.
Assessment And Preparation
Before diving into the replacement of your AC compressor, proper assessment and preparation are crucial. The right tools and knowledge ensure a safe and efficient process. Start by understanding your vehicle’s AC system and pinpoint the compressor’s location. Gather all necessary tools and equipment in advance. Adhere to safety guidelines to handle refrigerants. Get ready for a straightforward guide on compressor replacement without vacuuming.
Tools And Equipment Needed For Replacement
- Wrench set: For loosening and tightening bolts.
- Screwdrivers: To remove components blocking access.
- Pliers: For clamping and holding small parts.
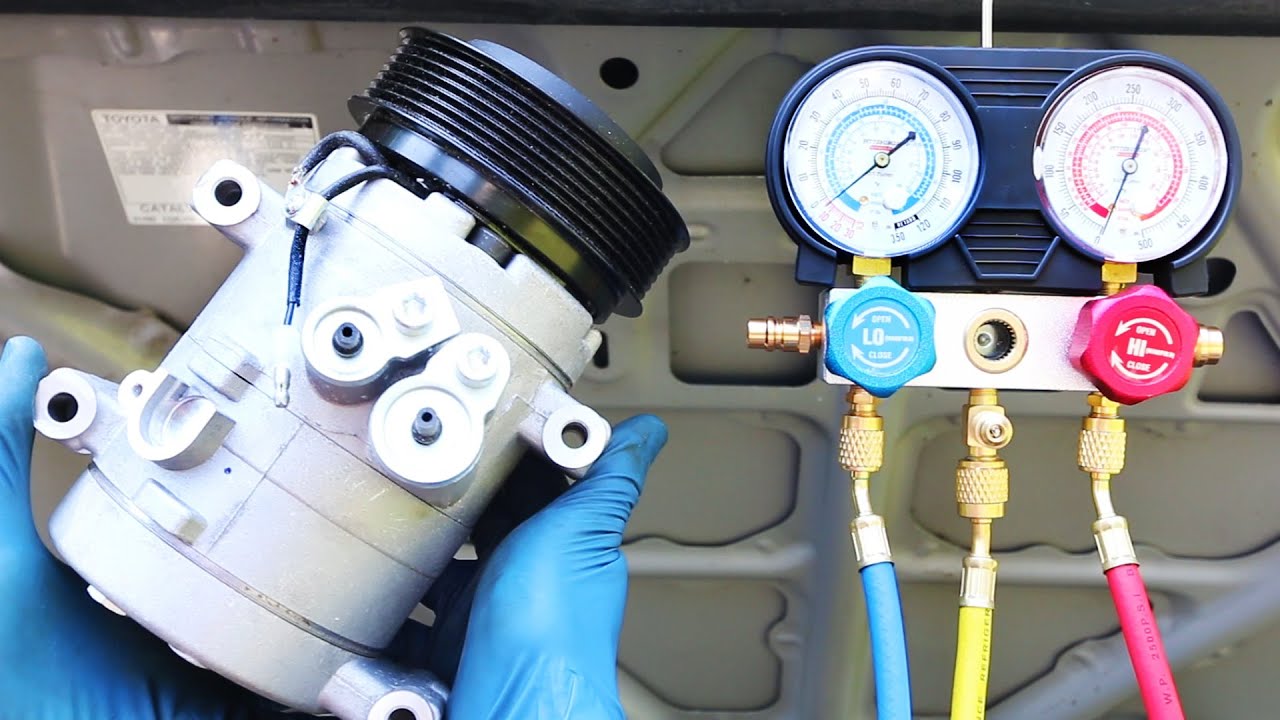
- Refrigerant recovery machine: Essential for recovering refrigerant.
- Safety glasses and gloves: To protect eyes and hands.
- AC compressor: Proper model for your vehicle.
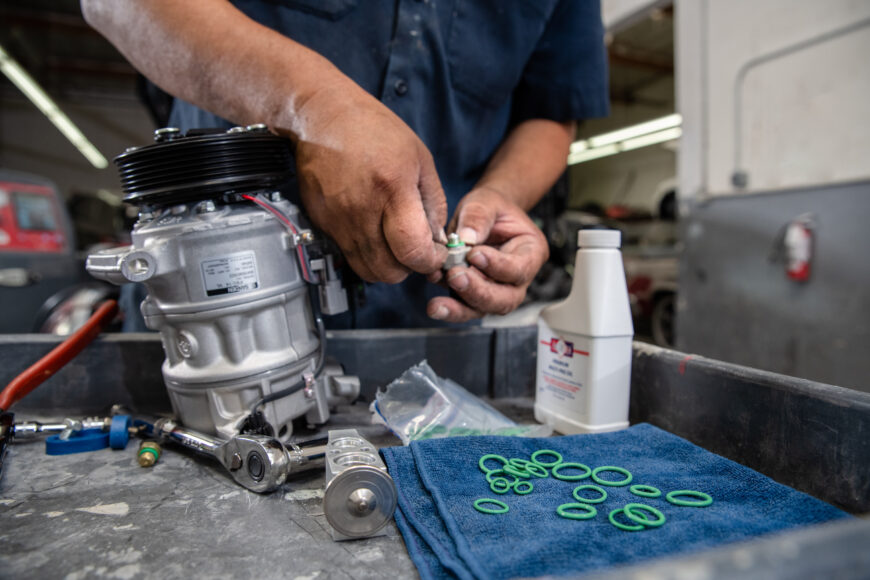
- Replacement seals and O-rings: For airtight connections.
- Refrigerant: The adequate amount for your system.
Safety Precautions And Discharge Of The System
Safety should always be your top priority. Refrigerant can be harmful to your skin and eyes. Wear safety glasses and gloves at all times during the compressor replacement. Secure the car with parking brakes and wheel chocks. Keep a fire extinguisher close by.
To discharge the system, start the engine and operate the AC on high until it stops due to low pressure. Shut off the engine. Attach the refrigerant recovery machine according to its manual. Extract all refrigerant to prevent any release into the atmosphere. This process makes your work environment safe and protects the ozone layer.
After the discharge, inspect seals and hoses for any signs of wear or damage. Replace them if necessary to avoid leaks after installing the new compressor. Now, you’re set to remove the old compressor and install the new one safely.
Removing The Old Compressor
Embarking on the journey to replace an AC compressor brings us to a critical phase:
The process demands careful steps to ensure a successful swap without causing further issues. Key actions involve locating the troublesome unit, handling refrigerants responsibly, and preparing to install the new compressor.
Locating And Detaching The Compressor
Firstly, locate the compressor. It’s typically at the front of the engine, connected to the serpentine belt. Follow these steps:
- Disconnect the battery to prevent electrical risks.
- Identify the serpentine belt routing.
- Use the correct tools to loosen the belt tensioner.
- Remove the belt from the compressor pulley.
- Unclip electrical connections leading to the compressor.
- Unscrew bolts fastening the compressor to the engine block.
- Gently remove the old compressor ensuring no strain on other components.
Handling Refrigerant And Environmental Considerations
Dealing with refrigerant is a delicate task. Note these points:
- Understand that refrigerant must be managed professionally to prevent environmental harm.
- Wear protective gloves and glasses.
- Use a certified recovery machine to collect and store the refrigerant.
- Avoid releasing refrigerant into the atmosphere.
Always adhere to environmental regulations for refrigerant disposal. Engaging a professional for this step is often the best approach, as they are equipped with the right tools and knowledge.
Credit: www.youtube.com
Installation Of The New Compressor
Swapping an AC compressor isn’t a simple task. But it is doable. The key is patience and precision. A new compressor promises efficient cooling. Let’s dive into the essential steps. We’ll prepare, mount, and secure your new compressor.
Preparing The New Compressor For Installation
Before installation, get the compressor ready. Here’s how:
- Confirm compatibility: Check the new compressor fits your car’s model.
- Remove plugs: New compressors often have shipping plugs. Take them out.
- Lubricate: Add the correct type and amount of oil.
- Check the clutch: Ensure it’s operational and properly aligned.
Mounting And Securing The New Compressor
- Position the compressor: Place it in the mounting area.
- Align bolt holes: Line up the holes on the compressor with the bracket.
- Thread bolts: Start by hand to avoid cross-threading.
- Tighten bolts: Use a torque wrench for the correct tension.
- Reconnect electrical: Hook up the wiring harness to the clutch.
- Reattach refrigerant lines: Secure O-rings and bolts.
Following these steps ensures a smooth installation. You’ll have cool air in no time.
Bypassing The Vacuum Process
Replacing an AC compressor usually involves vacuuming the system. This key step removes air and moisture. Yet, some may consider skipping this process. Let’s explore reasons to bypass vacuuming during AC compressor replacement, alternatives to this step, and the potential risks involved.
Reasons For Skipping Vacuuming
At times, service technicians might need to replace an AC compressor without access to vacuum equipment. One reason could be an urgent repair where the proper tools are not available. In certain cases, individuals may assume the system is already free of moisture and air, or they might just be unaware of the importance of vacuuming in the first place.
Alternatives To Vacuuming And Their Risks
Alternatives to vacuuming, such as using a refrigerant to push contaminants out, exist. However, these methods may lead to potential risks.
- Improper moisture removal
- Non-removal of air leading to inefficiency
- Incomplete contaminant extraction, risking system health
Risks of bypassing the vacuum process:
| Risk Factor | Potential Consequence |
|---|---|
| Presence of Moisture | Corrosion and system damage |
| Air in the System | Reduced cooling efficiency |
| System Contaminants | Wear and tear on AC components |
For those considering bypassing vacuuming, weigh the risks carefully.
Recharging The Ac System
After replacing an AC compressor, recharging the system is crucial. This step restores the refrigerant needed for cool air. Skipping vacuum purges may introduce risks, yet, careful procedures can mitigate problems. Follow along for these methods.
Refilling The Refrigerant
With a new compressor installed, it’s time to refill the refrigerant. Safety is paramount, so gloves and goggles must be worn.
- Locate the low-pressure port on your AC system.
- Connect your refrigerant kit’s hose to the port.
- Follow the kit’s instructions to add the refrigerant.
Ensure to check the pressure frequently while refilling. Overcharging can damage the system.
Checking And Testing The Ac System
After refilling, ensure the AC operates correctly. Start your car and turn the AC to maximum.
- Listen for unusual noises.
- Feel for cool air coming through the vents.
- Use a thermometer to test the vent temperature.
If temperatures drop and the system runs quietly, the replacement was successful. If issues arise, seek professional assistance.
Final Considerations And Maintenance
After replacing an AC compressor without a vacuum, it’s crucial to focus on the final tweaks. This ensures the system runs smoothly. Let’s delve into potential issues and maintenance tips.
Understanding Potential Issues And Solutions
Even with a successful installation, you may face some challenges. Here’s what to watch for:
- Air and moisture in the system can cause damage.
- Leaks might develop, reducing efficiency.
- Strange noises could indicate incorrect installation.
To address these issues:
- Monitor system pressure regularly.
- Inspect for leaks and seal if necessary.
- Ensure all connections are tight and secure.
Future Maintenance For Optimal Performance
Maintaining your AC system ensures longevity and peak performance. Stick to the following routine:
| Action | Frequency |
|---|---|
| Check refrigerant level | Annually |
| Inspect belts and hoses | Every oil change |
| Replace cabin air filter | 15,000 miles |
A well-maintained AC system is key to avoid future costs. Consistent checks and upkeep prevent common issues. Keep cool and drive with confidence!

Credit: www.amazon.com
Credit: www.autozone.com
Frequently Asked Questions For How To Replace Ac Compressor Without Vacuum?
Can You Replace Ac Compressor Without Evacuating System?
No, you must evacuate the AC system before replacing the compressor to prevent moisture and air from entering, which could damage the system.
What Happens If You Don’t Pull A Vacuum On An Ac System?
Not pulling a vacuum on an AC system leads to moisture and air contamination. This results in poor cooling, potential system damage, and reduced efficiency.
Do You Have To Vacuum A Ac System When You Replace The Compressor?
Yes, vacuuming an AC system is essential after replacing the compressor to remove moisture and air, ensuring proper function and longevity.
How Do I Get Air Out Of My Ac Without A Vacuum Pump?
To remove air from an AC system without a vacuum pump, turn the engine on and let it warm up. Next, activate the AC to its highest setting and open the hoods and valves to circulate refrigerant, which can push air out.
Conclusion
Tackling your AC compressor replacement can be straightforward if vacuuming isn’t an option. Remember to always prioritize safety and follow the steps outlined for a successful DIY project. With the right tools and a methodical approach, you’ll enjoy a cooler drive in no time.
Keep up with regular maintenance to prevent future issues. Stay cool and drive on!
How to Remove Pag Oil from Ac System?
How to Replace Ac Compressor Without Vacuum?
How Much Does It Cost to Replace an Ac Compressor in a Car?
When to Replace Ac Compressor in a Car?
How Long Does It Take a Mechanic to Replace an Ac Compressor in a Car?
How to Remove Air from Ac System Without Vacuum Pump?
Can I Just Replace the Ac Compressor in My Car?